Cardiopulmonary resuscitation, more commonly known as CPR, is an essential skill for health care providers and professionals, and having this knowledge can be the difference between life and death when dealing with an infant experiencing cardiac or respiratory arrest.
Since infant CPR differs substantially from performing CPR on older children, understanding the nuances between the two is crucial. Read on for a step-by-step guide to performing CPR on infants effectively so you’re equipped with professional, authoritative knowledge.
Recognizing the Need for Infant CPR
Before initiating CPR, it’s critical to first recognize the signs of cardiac or respiratory distress in an infant. Infants in need of CPR may exhibit no breathing or only gasping, an absent or weak pulse, or unresponsiveness to stimuli. Check responsiveness in infants by tapping gently on their feet or shoulders while calling out to them.
If you notice that the infant doesn’t respond or that their breathing is impaired, initiate CPR immediately. Time is critical in these circumstances, as oxygen deprivation can result in irreversible brain damage within minutes. Each moment lost delays the infant’s chances of recovery, underlining the importance of quick action.
Additionally, health care providers must always assess the environment for any factors that might have contributed to the infant’s condition, such as potential choking hazards.
Preparing To Perform CPR on an Infant
Once you’ve determined that an infant is unresponsive and requires CPR, the first critical step is proper positioning. Lie the infant down on their back on top of a firm, flat surface like a hospital bed, exam table, or even the floor if necessary. Tilt the infant’s head slightly back to open their airway. However, avoid excessive tilting, which can compromise breathing.
If you’re in a health care setting where specialized equipment is available, confirm that tools such as oxygen masks or automated external defibrillators (AEDs) are nearby. If you’re not alone, delegate responsibilities by asking a colleague to retrieve equipment or prepare an AED while you initiate CPR.
Delivering Infant Chest Compressions
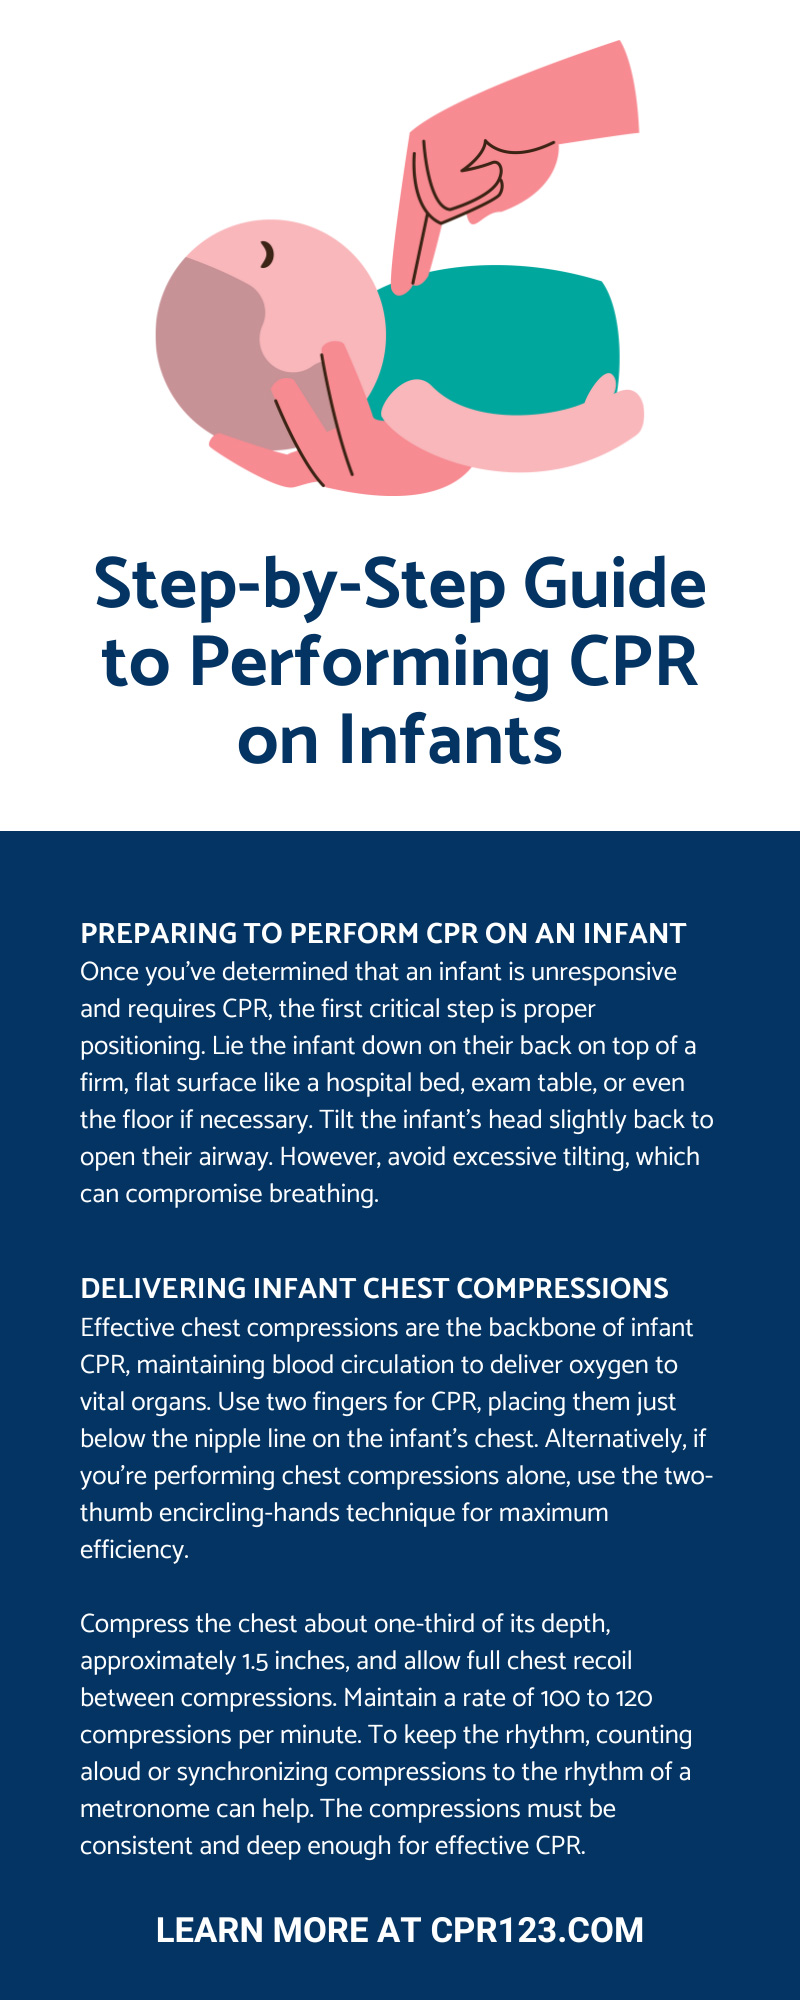
Effective chest compressions are the backbone of infant CPR, maintaining blood circulation to deliver oxygen to vital organs. Use two fingers for CPR, placing them just below the nipple line on the infant’s chest. Alternatively, if you’re performing chest compressions alone, use the two-thumb encircling-hands technique for maximum efficiency.
Compress the chest about one-third of its depth, approximately 1.5 inches, and allow full chest recoil between compressions. Maintain a rate of 100 to 120 compressions per minute. To keep the rhythm, counting aloud or synchronizing compressions to the rhythm of a metronome can help. The compressions must be consistent and deep enough for effective CPR.
Providing Rescue Breaths Safely and Effectively
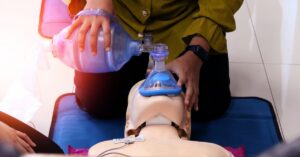
Rescue breaths are a vital part of infant CPR, as they provide the oxygen necessary for survival. After 30 chest compressions, or 15 compressions in the presence of a second rescuer, administer two rescue breaths. Do this by opening the airway and performing a head-tilt and chin-lift maneuver, being cautious to keep the head in a neutral position to prevent airway obstruction.
Create an airtight seal by covering the infant’s nose and mouth with your mouth or using a mask connected to a bag-valve device. Deliver each rescue breath carefully over one second, observing for any visible chest rise.
Excessive force or pressure must be avoided, as it could cause harm to the infant’s lungs. If the chest does not visibly rise, reassess the airway for blockages, then readjust the head position before attempting additional breaths.
Alternating Between Chest Compressions and Rescue Breaths
A central principle of effective infant CPR is seamless transitions between chest compressions and rescue breaths. For single-rescuer situations, the cycle ratio is 30 compressions to two breaths. If a second rescuer is available, switch to a ratio of 15 compressions to two breaths. Alternating roles every two minutes prevents fatigue, ensuring that compressions remain effective throughout the resuscitation effort.
Utilizing an AED
AEDs can be lifesaving in instances of infant cardiac arrest, but they must be used correctly. Fortunately, many AEDs are equipped with pediatric settings or pads specifically designed for infants. If pediatric equipment is unavailable, some AEDs allow the use of adult pads, provided they do not overlap.
Place one pad on the center of the infant’s chest and the other on the back. Follow the AED’s verbal prompts, pausing compressions as the device delivers a shock. Resume CPR immediately after the shock is delivered, as continuous chest compressions are necessary to sustain circulation during the critical moments of recovery.
Managing Airway Obstructions During CPR
Infant emergencies stemming from choking or airway obstruction require additional steps. If an airway obstruction is suspected during CPR, attempt to clear it first by delivering back blows and chest thrusts. Carefully inspect the mouth for visible objects, but avoid blind finger sweeps, which might push the obstruction further. Airway management tools, such as a suction device or intubation equipment, should be used if available and appropriate for the setting.
Understanding Ongoing Monitoring and Post-Resuscitation Care
Once an infant regains a pulse and spontaneous breathing, monitor their condition closely until further medical intervention arrives. Continuous observation of vital signs and reassessment for developing complications are necessary to stabilize the infant. Coordinate early with pediatric or neonatal intensive care units to minimize the risk of subsequent cardiac events or respiratory distress.
The Importance of Education and Confidence in Performing CPR
Confidence in performing infant CPR doesn’t come from conceptually understanding the steps; it comes from repeated practice under expert supervision. Health care professionals should regularly refresh their skills through certification programs like the Pediatric Advanced Life Support (PALS) course, which involves hands-on practice and technical knowledge.
CPR123 offers a PALS certification course to equip you with the expert techniques necessary to provide essential life support for infants and children. Our certification course ensures that every health care provider is equipped to deliver exceptional care when and where it matters most.
Infant CPR is a lifesaving skill that every health care provider should learn. Knowing how to act during a crisis can preserve the brain, heart, and other vital organs while awaiting advanced medical intervention. By learning this step-by-step guide to performing CPR on infants, staying calm under pressure, and undergoing proper training, you can increase the chances of a successful recovery.